
Continuing the Security Tips series I started in July '13, today I wish to discuss with you all the topics listed after the following links. Just in case you want to access the last posts in this series, here are the links:
Part 1: General Guidelines - Click Here
Part 2: Microsoft Windows - Click Here
Part 3: Macintosh - Click Here
Part 4: Guest Accounts - Click Here
Part 5: Windows Firewall - Click Here
Part 6: Event Viewer & Netstat - Click Here
Part 7: Antiviruses - Click Here
Part 8: Data Encryption - Click Here
Part 9: Cryptography Tools & True Crypt - Click Here
Let's first consider in brief the structure of this post.
- Introduction
- Cookies
- Internet Explorer Security Settings
- Internet Explorer Security Settings: Internet Zone
- Internet Explorer Security Settings: ActiveX Control
- Internet Explorer Security Settings: Local Intranet Zone
- Internet Explorer Security Settings: Trusted Zone
- Internet Explorer Security Settings: Restricted Zone
- Internet Explorer Privacy Settings
- Securing Files Downloads
- Mozilla Firefox
- Mozilla Firefox Security Settings
- Mozilla Firefox Privacy Settings
- Securing File Downloads
- Google Chrome
- Google Chrome: Privacy Settings
- Google Chrome: Security Settings
- Apple Safari
- Apple Safari: Security Settings
- Conclusion/Comments
Introduction
Internet Security involves basic security measures to protect a user’s account from attacks when connected to the Internet. It explains security elements that are necessary for the user to use the Internet safely.
Coming to more precise and detailed thing, Internet Security involves protecting the user’s data and information from unauthorized access (through Internet attacks), apart from the various viruses, and other malware.
Attacks on the Internet are common through (but not restricted to) the following:
- Emails: An important means of communication, and traditionally a great way to spread viruses. The email attachments and the stupid links are the most common way how the attackers spread the viruses. At times they’d use the fake email IDs which’d resemble some real email ID and an inattentive user will fall prey.
- IM: Although the days of Yahoo! Messenger, gtalk, etc. are gone, but facebook and skype messengers have gain huge interest of the users, and thus the attackers. Those who have used the Yahoo! Messenger, know how the chat rooms are infected with spam bots who keep spreadin the malware all the time.
- File Sharing and Downloads: Ultimately virus comes from some file you downloaded, intentionally, unintentionally, yourself, or some automated script on a malicious website did that. Thus be careful of what you download on the Internet.
Cookies
A cookie is information provided by a web server to a web browser and then sent back unchanged by the browser to that server when the browser access that server. Your sessions are managed using cookies on most websites. You must have noticed the ‘Keep me signed in’ or ‘Remember me’ checkbox on 99.99% websites at the login form. That actually generates a cookie with a large session time (typically 30-60 days) with the user login credentials (encrypted). Thus when you open that website next time, the web browser automatically logs you into that website by checking that cookie with the server.
Cookies are not viruses, and they have encrypted information. Still they are dangerous. Why? They hold your important information, like your login credentials. Try this: Delete your cookies and open my blog again. You’ll see totally different kind of ads! Why? Because the advertising websites generate a cookie that tracks your internet activity broadly. I mean they track the “type” of website visited by your browser. This information is then used to target ads which they think are of your interest based on the types of websites you visited.
Though this ad-racking thing is not risky, and sometimes helps us getting good and relevant ads (for a change), but the cookies still hold your login credentials and session information, even though the information is encrypted. Thus, you must keep them clear off your computer.
Internet Explorer Security Settings
Let’s start by configuring Internet Explorer for security. I’d suggest you all that, in case you use Internet Explorer, try to transfer to some other web browser which is safer. Internet Explorer is a good browser, but unfortunately, quite unsafe.
Let’s first open the security settings, and then I shall discuss in details how to configure them. I am discussing Internet Explorer in more detail than the other web browser. With a proper mapping, you can find most things are common to all browsers.
Launch Internet Explorer -> Click the Tools button -> select Internet Options.
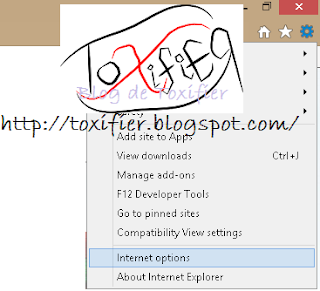
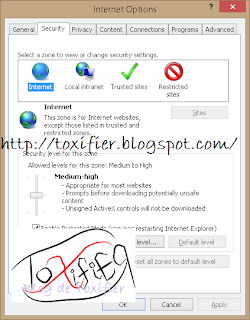
Select the Security Tab and see what all are the zones different websites can be classified into. You can use these settings to make yourself more secure, block certain websites, etc.
Internet Explorer Security Settings: Internet Zone
The Internet Explorer includes predefined zones: Internet, Local Intranet, Trusted Sites, and Restricted Sites. A user can set the security options for each zone and add or remove websites from the zones by estimating the level of trust or risk in a particular website. The Internet zone is for all websites except those listed in the trusted or restricted zones.
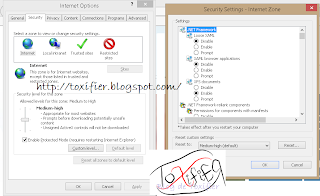
Just select a zone for which you’d like to configure the settings. Then use the slider to adjust the security levels. The information displayed to the right of the slider clearly explains what happens at that security level set by the slider. You can click the custom level… button to set certain different criteria.
Internet Explorer Security Settings: ActiveX Controls
ActiveX controls are the building blocks of a small program that distribute applications through the web browser. By default, Microsoft has set the security settings for it to medium. Thus by default you can run signed ActiveX controls.
Now since you are free to change this default behaviour, you can set the security level for ActiveX to low/medium/high/custom. Why would you like to do that? It is because these ActiveX controls can be used to install software on your system, like Windows Update does. But some malicious person might use them to install viruses on your system. So staying on guard, is better. To protect yourself from such threats you can do the following:
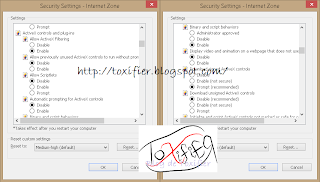
- Disable the ActiveX Controls and Plugins options in the Security Settings. With Windows XP gone, we don’t need browser to update, right? Windows 7 onwards has got that Update Utility.
- Enable the Automatic prompting for ActiveX controls option so that the browser prompts when an ActiveX control or plug-in needs to be enabled.
- Click Ok to apply the settings
You have got more options if you wish to customize more. But I am sharing the common ones that are sufficient for a nice level of security. Alternatively, use the High level from the drop down list.
Internet Explorer Security Settings: Local Intranet Zone
The Local Intranet Zone covers the sites on the Intranet. To add websites to the Local Intranet Zone:
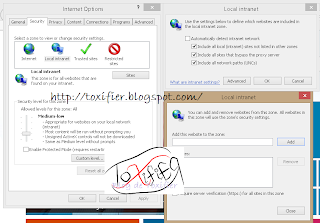
- Select Security -> Local Intranet
- Click Sites.
- Click the Advanced button.
- Enter the URL into the Add this website to the zone: column and click Add.
- Click OK to apply the settings.
Internet Explorer Security Settings: Trusted Zone
A trusted zone contains those websites that a user believes will not damage his or her computers or data.
To add websites to the trusted site zone:
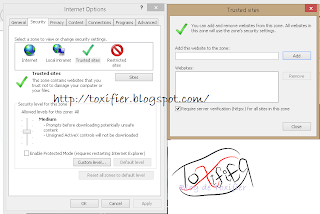
- Select Security -> Trusted Sites
- Click the Sites button
- Enter the URL into the Add this website to the zone: column and click Add.
- Click OK to apply the settings.
Internet Explorer Security Settings: Restricted Zone
The restricted zone restricts access to the websites that might damage a computer. Users can avoid accessing a restricted site by adding it to the restricted zone. The Restricted Sites zone will help prevent the installation of unwanted applications, reduce unwanted pop-ups, and not allow sites to run unwanted scripts. This setting also protects the privacy by not sending cookies to sites in the Restricted Sites Zone.
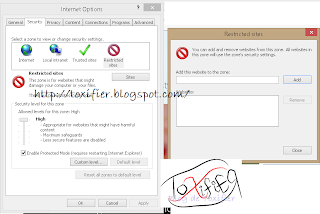
To add websites to the restricted site zone:
- Select Security -> Restricted Sites
- Click the Sites button
- Enter the URL into the Add this website to the zone: column and click Add.
- Click OK to apply the settings.
Internet Explorer Privacy Settings
Information stored in a cookie is limited in such a manner that it cannot carry a virus. But the information is good enough to be of use for someone who knows how to use it for bad things, like session hijacking.
So keeping the cookies clear is a good idea. I have time and again stressed upon the use of CCleaner. The free version does most of the tasks.
To configure cookie settings in Internet explorer:
- Choose Internet Options from the Tools menu on the browser.
- Select the Privacy tab and use the slider to set the level to low, medium, medium-high, or high.

- Block all or accept all cookies, depending on the requirements. Though for a home user who access so many websites that need cookies, I guess you’ll have to stick to accepting the cookies.

- Check the Turn on Popup Blocker option to block pop-ups that appear while visiting websites.
Deleting the Browser History
That sounds familiar right? You have done that sometime because some forum suggested, or to protect your privacy from others, or your ISP customer support said, your Internet is slow due to Temporary and Cache data, so you need to clear it. Clearing the browsing history protects your privacy, a little step to clearing your Internet footprints (at your PC atleast!) and also saves you Hard Disk Space. Here by history I not only mean the browsing history, but also the micro caches of the browser, cookies, private data, temporary files, etc. You should clean your Internet temp monthly, or once in three months atleast. Again you can use the CCleaner to automate the job for you. For better results, you may try TuneUp Utilities.
- Choose Internet Options from Tools menu.

- Go to the Browsing History section
- Check the desired options in Delete Browsing History window. I suggest cleaning everything (not just history) once in three months atleast.
- Click Delete to delete browsing history.

A personal suggestion is don’t save your passwords on your browsers! They are really risky if someone gets access to your PC. I don’t mean just a friend playing a prank on you, but the viruses too, who can get access to the passwords that you might have saved.
Securing File Downloads
Sometimes the file download starts automatically, or the location of the download is not asked. This should be taken care of and thus all downloads should prompt and on user’s acceptance should be downloaded. Users can configure the download settings in the Internet Explorer to set permissions to download files from the Internet. This setting controls whether Internet Explorer should allow downloads or not. File downloads can either be enabled or disabled.
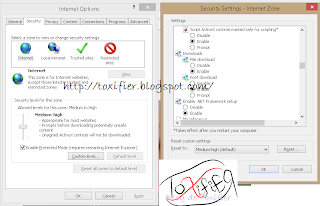
- To configure the download settings for Internet Explorer, click Tools -> Internet Options -> Security.
- Select the Custom level button in the Security Settings window.
- In the Downloads settings, enable the File Download, and Font Download options.
- Click OK to save the settings.
Mozilla Firefox
Firefox is a secure, fast, and customizable web browser. Securing Firefox Settings is easy just like the Internet Explorer. Launch Mozilla Firefox. Click Tools -> Select Options.
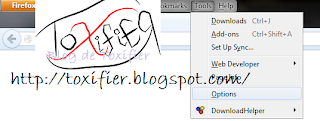
Mozilla Firefox: Security Settings
A user can control the level security. You can customize settings like passwords, cookies, popups, etc. Following are the steps:
- Select Security from the Options window.


- Check the option Warn me when sites try to install add-ons so that the browser prompts before installing add-ons to the browser.
- Click the Exceptions button and enter the URL into the Address of Website field and click Allow to specify the websites allowed to install add-ons.

- Check the Block reported attack sites option to prevent the user from visiting malicious websites.
- Check the Block reported web forgeries option for Firefox to actively check whether the sites visited may be an attempt to mislead the user to provide personal information.
- Uncheck the Remember Passwords for sites options to prevent the browser from remembering passwords for login pages visited.
Mozilla Firefox: Privacy Settings
To set the privacy settings in the browser, follow these steps:
- Select Privacy in the Options window.

- Firefox allows the user to choose if they want the browser to remember their history. The user may select the option Never remember history to maintain privacy.
- Click Clear your recent history.
- Select the time range to clear the history.

- Check the options required to clear the history and click Clear Now.
Securing File Downloads
Just like we did for Internet Explorer, we need to secure file downloads for Firefox too. But it is pretty simple.

- In Firefox, files are downloaded by default to Documents -> Downloads. We must change the setting such that it asks every time where to save the file.
- Navigate to Tool -> Options -> General
- Check the option Always ask me where to save the file to allow the browser to ask before downloading a file to the desired location.
Google Chrome
Another popular browser we have by the name of Google Chrome, developed by Google. TO change the security/privacy settings:
- Launch Google Chrome.
- Navigate to http://chrome:settings

- Click Advanced Button at the end of the page
Google Chrome: Privacy Settings
Google Chrome: Security Settings
In the Google Chrome Settings:
- Secure Sockets Layer(SSL) is an Internet Protocol used by many websites to ensure safe data encryption and transmission. The SSL setting in the web browser is turned on by default.

- Some websites require the older version, SSL 2.0, so check the Use SSL 2.0 checkbox too.
- Check the Check for server certificate revocation option to turn on real-time verification for the validity of a website’s certificate for extra security.
Apple Safari
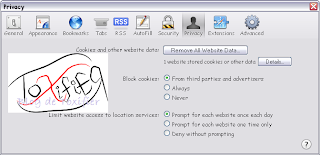
By default, Safari is set to display a few web features, such as some movies, animation, and web applications. A user may wish to turn off these features to help protect privacy from possible security risks on the Internet. The Safari browser contains features equivalent to those in Firefox, with some differences. To change the security settings in Apple Safari:
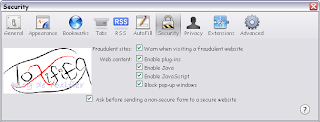
Apple Safari: Security Settings
To configure security settings in Safari web browser:
- Select the Security Tab in the preferences window.
- The Web content section permits the user to enable or disable various forms of scripting and active content.
- It is recommended to accept cookies only from sites visited.
- Check Ask before sending a non-secure form to a secure website option, which allows the browser to warn the user before opening any website that is not secure.
Conclusion/Comments
I hope you find all the relevant information you must know about the topic of security I discussed with you all today. For any queries or suggestions please feel free to comment here.
I hope you all have a great day ahead! :) Happy Tuesday :) See you all soon! :D


No comments:
Post a Comment
Kindly keep the comments clean and make quality comments that would be worthy in making this blog better! :)