

Continuing the Security Tips series I started in July '13, today I wish to discuss with you all the topics listed after the following links. Just in case you want to access the last posts in this series, here are the links:
Part 1: Click Here
Part 2: Click Here
Part 3: Click Here
Part 4: Click Here
Part 5: Click Here
Let's first consider in brief the structure of this post.
- Introduction
- Event Viewer: Launching Event Viewer in Windows 7
- Event Viewer: Events and How to read logs on the System
- Disabling unnecessary services and killing unwanted processes in Windows 7
- Netstat Tool
- Audit Policy
- Hiding Files and Folders
- Disabling Simple File Sharing in Windows 7
- Conclusion/Comments
Introduction
The main thing I would like to discuss with you all today is the Event Viewer and the Netstat Tool, together with the security audit policies. Apart from that I would liek to discuss with you all how and why to disable Sinple File Sharing(with screenshots and steps for Windows 7).
Event Viewer is a built-in Windows utility that allows users to view and manage the event logs, gather information about hardware and software problems, and monitor Windows Security Events. It stores logs of applications, security, and system events. It maybe helpful in detecting any security breach and troubleshooting problems and errors with Windows and other programs. The user can view events that have taken place on the machine by choosing an appropriate log in the tree on the scope pane. It provides an interface to the user that makes it easier to filter and sort events as well as control the types of event logs. The user can gather information about the software and hardware in the system, and can manage those events with Event Manager. Event viewer displays detailed information about significant events in the system.
Event Viewer: Launching Event Viewer in Windows 7
Event Viewer, a component of Microsoft's Windows NT line of operating systems, lets administrators and users view the event logs on a local or remote machine. In Windows Vista, Microsoft overhauled the event system.
It's pretty simple to open Event Viewer. Just follow the steps in the pictures here:
1. Click Start

2. Click Control Panel

3. Select System and Security

4. Select Administrative Tools

5. Double Click Event Viewer to launch it.

Event Viewer: Events and How to read logs on the System
The user must know the logs in his system, right? Afterall that's the purpose of our Event Viewer that I am discussing with you all! By knowing these logs you can detect any unauthorised events.
Remember, there are 5 categories in which this Event Viewer categorises the events: Error, Warning, Information, Audit Success, and Audit Failure. It is these levels based on which we can differentiate between the events that need urgent attention. Apart from these levels, each event is differentiated by a description of the event with a header information. The header contains a detailed description of the level, date, time, source, event ID, and task category.


A few links I think you guys will find useful for consideration when you wish to know about Event Viewer:
How to view and manage event logs in Event Viewer in Windows XP

What information appears in event logs? (Event Viewer)

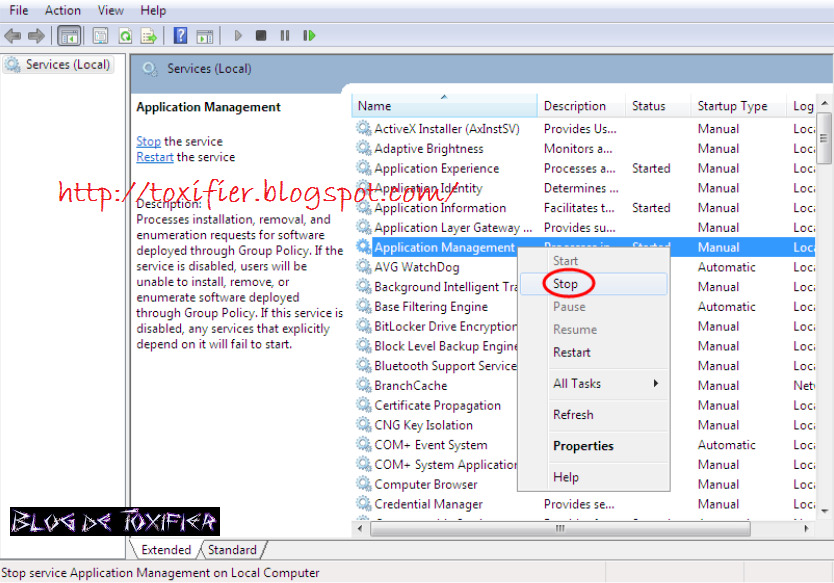
Disabling unnecessary services and killing unwanted processes in Windows 7
A service doesn't require the user's intervention. It is a long running executable that is intended to perform specific functions. Services normally start up when the system boots up. Some services load automatically, while others are called when a program is used. To disable unnecessary services:
1. Click on Start -> Control Panel -> System and Security -> Administrative Tools -> Services

ALTERNATIVELY: Click Start, and type: services.msc and press Enter to pen the services window.
2. The services window is now loaded. You can disable any unwanted services.
Killing processes is something everyone with a computer knows. Remember the good-old Ctrl-Alt-Del Team to the rescue?

But for the completeness of this article, I must talk about it here. But I think a screenshot would be enough to help you realize :)

Netstat Tool
Netstat (network statistics) is a command-line tool that displays network connections (both incoming and outgoing), routing tables, and a number of network interface (network interface controller or software-defined network interface) and network protocol statistics. It is available on Unix-like operating systems including OS X, Linux, Solaris, and BSD, and is available on Windows NT-based operating systems including Windows XP, Windows Vista, Windows 7 and Windows 8.
Thus we can use this utility to know open ports, and their associated applications. This can help in patching any ports that seem suspicious.
Knowing open ports as well as the services and applications associated with these ports helps in detecting the presence of malware such as virus, worms, Trojans, etc. on the system. Malware generally opens ports to create remote connections with attacker machines and send and receive data in the background.
1. Click Start -> All Programs -> Accessories, right-click Command Prompt, and click Run as Administrator. Type the password or provide confirmation if prompted.
2. Type netstat -b in the command prompt window to see the open ports and associated applications.

For all options, consult this link: http://en.wikipedia.org/wiki/Netstat#Parameters
Audit Policy
Audit policies should be configured to identify attempted or successful attacks on a system/network.
1. Click Start, type: secpol.msc in search bar and press Enter

2. Click Local Policies, select Audit Policy, double-click the Audit account logon events policy, check the Success and Failure boxes, click Apply, and click OK.

3. Similarly, change the security setting for all policies listed in the right-hand pane of the Local Security Policy window.
4. Close the local security policy window.
Hiding Files and Folders
Apart from deleting history and clearing some traces, a lot of people like to store stuff after a nice fap-time in weird locations or in hidden folders :P Admit it, you have done that some time or the other in your life, if not the 'unmentionable sutff', then of course some secret password files, or some other stuff you wanted to keep hidden on a shared PC. So this is again something quite common but again for the completeness of the article, I'd share it.

1. Right Click the file or folder to be hidden and select Properties.
2. Under Attributes, check Hidden, click Apply, and then click OK.
3. In the windows explorer click Organize -> select Folder and search options. In the Folder Options window, click view Tab.
4. On the View Tab, there is a list of options.
5. Select the Do not Show hidden files and folders option.
Alternatively, and I'd say it is much better to use Folder Locking software for safeguarding your private stuff. I had shared about some good and popular ones earlier, which you guys can check here: http://toxifier.blogspot.com/2012/05/file-locking-software-super-sunday.html
Disabling Simple File Sharing in Windows 7
File Sharing feature in Windows OS enables users to access and share files with other users on a network. Although, it presents potential security risks. Why? Well, the attackers can access all the shared files in a network, if they are able to access a system in the network. File Sharing feature should thus be disabled, if you don't need it. It's quite simple to disable simple file sharing :D

1. Go to Start -> Control Panel -> Folder Options.
2. From the Folder Options window, choose the View Tab.
3. Scroll to the bottom of the Advanced Settings portion of the window.
4. Uncheck the box for Using sharing wizard and OK.
Conclusion/Comments
I hope you find all the relevant information you must know about the topic of security I discussed with you all today. For any queries or suggestions please feel free to comment here. I hope I'll be back soon with part 7 of this series! :D
I hope you all have a great day ahead! :) Happy Tuesday :) See you all soon! :D
The best of tips..really I like it thank you very much.
ReplyDeleteThanks and your welcome! :D
Delete