
Remember last month I was doing the security walkthroughs? The little tips to add some extra security to your PC/Mac? If you missed them, you can check the earlier 3 parts here:
Part 1: Click Here
Part 2: Click Here
Part 3: Click Here
Also, I promised to make some more posts in this series about the firewall, guest accounts, event logs, etc. I am working on them, don't worry. The User Account/Guest Account one is here for you all today! :) Consider it the Part 4 in that series! :D
So the flow of this guide would be like:
- Disabling Guest in Windows 7
- Disabling Guest in Windows XP
- Locking out unwanted Guests in Windows 7
- Renaming Accounts in Windows 7
Before we continue, I would first like to draw your attention towards a problem. If your Operating system is not Professional/Ultimate Edition, this won't work for you. Atleast not in Windows 7.

The Local Users and Groups tab is there only in Professional and Ultimate Editions. Make sure you click any images to enlarge them and have clearer look :)
Why lock out Guest Account?
Unwanted Guest Account can be exploited by attackers to gain entry in to the system. Thus I want to help you all safeguard yourself from such troublesome people.
So, let's start? :)
Disabling Guest Account[Or any account you wish to disable] in Windows 7
Step One is quite straight forward, Click on the Start Button. Right Click on Computer. Click on Manage.

Now Computer Management Windows will open up. Go to Local Users and Groups -> Users.

If you see this icon
 left of the Guest[Or any account you wish to disable], it means Guest Account[Or any account you wish to disable] is disabled. Else it is enabled. To disable it:
Double Click on the Guest[Or any account you wish to disable]. Properties will open up. In the user's properties Window make sure that the check box next to Account is disabled is checked. Click OK.

You are done! :D
Disabling Guest Account[Or any account you wish to disable] in Windows XP
The steps are same as that in Windows 7. So I am just sharing the screen shots.


Locking out unwanted Guests in Windows 7
Lockout unwanted guests by configuring the settings of the account lockout policy to limit the number of login attempts and prevent attacks by blocking the user account when incorrect login attempts exceed the limit. Now how to do that? Chill out, I am telling you :)
Go to Control Panel, and Click Administrative Tools. In case you are having troubles with the look, you can switch to the classic view, I hope you know how to do that!
Double Click Local Security Policy, click Account Policies, double click the Account Lockout Policy, and double-click the Account Lockout Threshold.
At the prompt, enter the number of invalid logins.
Click OK and close.

Now those unwanted people guessing my password are locked out! YEAH!! :P
Rename User Accounts in Windows 7
So this is a classic trick and must be done by everyone as soon as possible. Renaming your user account. When the user account is created, the Home Folders are created by the same names. When somebody knows your username, he gets to know your Home Folder path too! Now to safeguard, you should rename your User After creating it. This makes the Home Folder to retain the name the User was created with, but change the User's name. Hence, even after knowing your User's name, one cannot be sure of it's Home Folder! :)
Atleast rename your Administrator Account if you don't wish to rename all the accounts. The Administrator account exists on all computers running the Windows Operating System. Attackers may guess or crack the administrator password to get unauthorized access to system resources. Uses should always rename the administrator account name to make password guessing difficult.
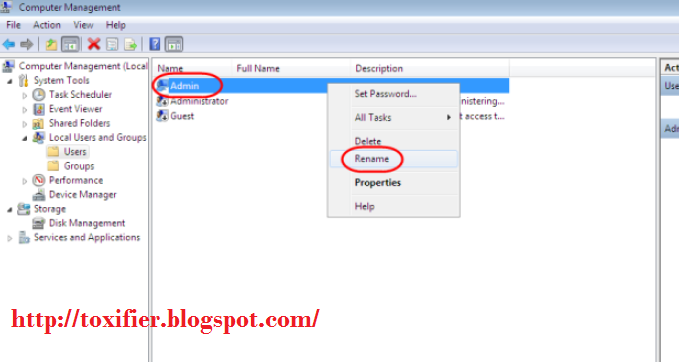
Click Start Button, right click Computer, and click Manage.
In the Computer Management Window, click Local Users and Groups, and select, Users.
Right click on user Admin or Administrator, select Rename, type the new name for the account and click OK.
And so, we are done! :D Your computer now has some more added security! :)
Have a great day. I hope you all find this post useful. I will be coming up with more soon. Take care! :) See you all soon. All comments and suggestions are welcomed, ALWAYS! :D
No comments:
Post a Comment
Kindly keep the comments clean and make quality comments that would be worthy in making this blog better! :)